How to Look Your Best In Zoom: A Photographer's Simple Setup
May 15, 2020 / Photography / tips - lighting
The other day, I participated in my first Zoom meeting call.
Because I’m a photographer, I automatically set my work area for optimal lighting.
If you don’t know what I mean by lighting, read on.
Since we’re stuck at home and in front of the camera on Zoom, Skype, or Meet Now for the foreseeable future, I thought it might be helpful to show you a simple setup you can do without buying anything.
Follow these guidelines, and you’ll look great at your next Zoom meeting!
Simple Steps to Great Lighting in Zoom
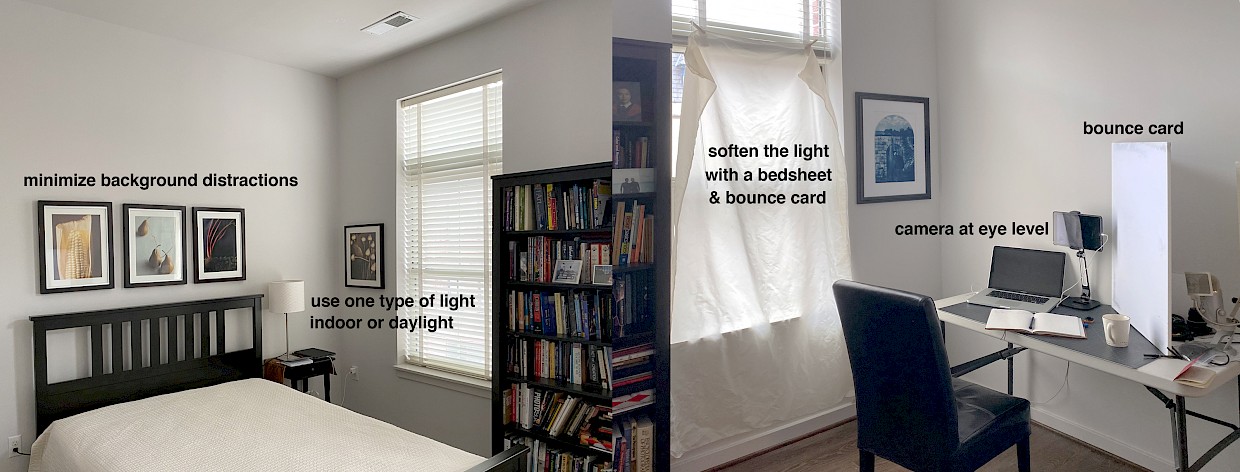
The first thing I did was look at my work area (aka the guest bedroom). I collaged two pictures above so you can see what the bedroom looks like.
Here’s what I did to set up for the zoom call.
- Turn off all the indoor lights so there’s only window light coming in.
- Hang a white bed sheet over the nearest window on my left to soften the light
- Raise the iPad camera to eye level
- Check the background for distractions and potential “merging” issues
I’ll go through each step to explain my thought process and why they work.
Turn Off the Lights and let the Daylight In
The key to good lighting for video meetings is to control the camera’s color setting or white balance.
But here’s the problem: most computer cameras only have auto white balance (AWB). This is true for iPad and iPhone cameras too. This means that the camera recalibrates what it considers “neutral white” depending on what’s included in the frame. It’s influenced by the dominant color that happens to be in the frame at any one time—your clothes, walls, table, and your light source.
For most purposes, AWB doesn’t present problems. But for important meetings with the boss or a job interviewer, for example, it’s best that there are no weird color casts giving a less than professional look. For example, you don’t want your face to look too red or too blue.
To work within the camera’s limitations and avoid unpredictable color issues, don’t mix light sources. Use either daylight or indoor light only. In my situation above, I turned off all the lamps and just used the daylight coming from the windows. This is the safest alternative given that you can’t control the AWB of the camera.
Soften the Light with a Bed Sheet
You know why portraits taken by professional photographers look amazing?
The secret to great looking portraits is in the light quality. Generally speaking, soft light is preferable to hard light. To look great on a Zoom meeting, you need to create soft light.
The easiest way to create soft light, without expensive equipment like a photography “softbox,” is to ensure you do two things (1) Use a large light source and (2) use a white bed sheet. You could also use a white sheer curtain, a white pillowcase cut in half, or a white muslin cloth. Anything translucent and white will do. You already know why I say white, right?
Here are the general rules professional photographers use to manipulate the quality of light:
- The smaller the light source, the harder the shadow, and the less friendly you will appear on camera.
- The larger the light source, the softer the shadow, and the friendlier you will appear on camera.
Hard vs soft just refers to the shadow’s outline and how the dark or diffuse it appears. Generally speaking for portraits and video calls, you want a soft shadow as it’s more pleasing to the eye. In my case above, I have a large light source from the window. I softened it further by hanging a bedsheet. To soften the shadow side of my face, I also used a white bounce card. This could be any stiff white cardboard.
When you set up for your video call, maybe you decide that you don’t need a bedsheet. That’s ok as long as you never use a small light source like those LED lights that I constantly see for sale on Facebook that you plug into your computer. Remember, a small light source casts a harder shadow, which generally speaking, will not look great.
Use Textbooks to Raise the Camera to Eye Level
Generally, you don’t want the camera to be angled upwards and looking up at you. You’ll look like a dictator or Dracula.
Did you know the two holes in your nose are called nares? I didn’t know that. I had to google it. You don’t want the camera looking up your nares either.
You want to look straight at the camera. You’ll look more professional if you do. The solution is to place your computer on top of some textbooks so that the camera lens is at eye level. In the image above, I’m using an iPad on a stand that raises it to eye level. That works too.
Some people advise that the lens should be slightly above eye level and angled downwards. Experiment with this part and see what you prefer, but never put the camera below eye level.
Remove Potential Distractions
A good photographer removes anything within the camera frame that could distract from and be inconsistent with the intended message.
Get Rid of Visual Magnets
If you want to look great, competent, and professional on a Zoom call, nothing should be in the background that will distract the viewer’s attention. This might include shiny objects, eye-catching book covers, or strong saturated color. This also covers backlighting coming from a window or a bright lamp behind you. Our eyes are attracted to the brightest thing on the frame so you want to avoid this. Also, backlighting will fool the AWB and camera’s exposure setting. That’s why in my setup, I closed the blinds behind me to reduce the bright light coming from the back. Here’s the collaged picture again.
Avoid Merging
Merging is another type of distraction. The fact that there is an actual term for it means that it happens a lot without people realizing it. It’s an understandable oversight. A photograph is a two-dimensional medium and we live in a three-dimensional world with depth. There is no depth in a photographic print. It simply “merges” or “collapses” the foreground and background onto a thin piece of paper. When people take pictures, they don’t mentally merge the foreground and background to account for the photograph’s limitation. Incidentally, this camera limitation is how Peter Jackson in the Lord of the Rings made the hobbits look small in relation to humans. The hobbits were in the background and the humans in the foreground. The camera then collapses the view and tricks us into thinking that all the characters are in the same plane facing each other. Same thing with joke pictures, like people squishing the Eiffel Tower with their fingers. Merging happens when a background element appears to grow out of a person’s head or body, like a houseplant growing out of a person’s head! Before you dial into the video call, check your video to ensure there are no merging issues around your face or upper body.
If your background is full of visual magnets and merging issues that you can’t do anything about, then use Zoom’s virtual backgrounds.
Be Aware of the Audio!
While I’m an accountant/photographer and not a sound engineer, I’ll include this audio advice anyway. Set your phone to “Do Not Disturb” and exit from all social media apps on your phone and computer. Don’t run the dishwasher or the washer and dryer. Your home line should directly go to voicemail and turn off the phone volume. Also, put a note on your door saying not to ring the doorbell or knock. If possible, close and lock the door to the room you are in so that no one accidentally disturbs you. Check your audio quality before the call.
And while you’re on the call, mute yourself if you’re not talking. I don’t know how many times I’ve been on work video calls where there’s paper shuffling, typing, and side conversations everyone can hear on the video call!
So that’s it. You’re all set for applying photographic principles of color, lighting, camera angle, and composition. I promise you’ll look great on your Zoom call.
I Need Help with Zoom Lighting at Home
Do you want me to comment on your specific zoom lighting issue at home?
Take several pictures on your phone (videos are good too). Do a 360-degree pan of your workspace and upload the files below. I will post your pictures (anonymously) in this blog post, along with my recommendations for improvement. By uploading here, you agree to have me use your files in this way. I’ll email you once I have the post up. Until next time, stay safe!
User Case: Picture is too Dark
A user uploaded this video to ask for help on zoom lighting. Her video picture was too dark. How do you fix it?
Two things were problematic:
- the red lamp creates a color balance issue for the camera. Also, it’s too dim compared to the side lighting.
- the backlighting coming from back windows will confuse the auto exposure settings of the camera and make the picture too dark.
Solution
- Replace the lamp or the lampshade to a lighter color. This will remove potential color issues and increase the light output from her main light.
- Close the blinds at the back of the room.
After she made these two changes, she reported the video picture looked great!